Installing a cedar barrel sauna is one of the most rewarding outdoor improvement projects a homeowner can undertake. Done right, it transforms your backyard into a personal wellness retreat — a space that pays back in relaxation, health benefits, and genuine enjoyment for years to come. But like any permanent outdoor structure, the difference between a sauna that lasts decades and one that causes headaches comes down almost entirely to preparation.
At Northern Lights Cedar Barrel Saunas, we have been crafting and shipping high-quality cedar barrel saunas for over 25 years. We have seen installation projects in suburban backyards, lakeside properties, mountain retreats, and commercial spas across North America and beyond. Through all of that experience, one truth has never changed: getting the site preparation right the first time saves enormous time, money, and frustration down the road.
This comprehensive guide walks you through every stage of barrel sauna site preparation — from choosing the optimal location to laying a solid foundation to wiring for your heater — so that your sauna is built on a foundation as solid as the relaxation it will deliver.
Step 1: Choosing the Right Location for Your Barrel Sauna
Before a single tool is picked up or a single stone is moved, the most important decision you will make is where to place your sauna. A poorly chosen location can undermine the entire experience — no matter how well the sauna itself is built. Here are the key siting factors to evaluate:
Privacy
A sauna is a deeply personal wellness space. Most bathers prefer to use it in complete privacy, whether alone or with close family. Before settling on a location, walk your property and assess sightlines from neighboring homes, public spaces, and high-traffic areas. Natural screening from existing trees, hedgerows, or fences is ideal. If your preferred spot lacks privacy, consider adding lattice panels, cedar screens, or fast-growing privacy plantings as part of your installation plan.
Distance from Your Electrical Panel
This is a factor many first-time buyers overlook until they receive their electrician’s quote. Heavy-gauge outdoor-rated electrical wire is not cheap, and the longer the run from your main panel, the higher the cost. Wherever possible, site your sauna to minimize the electrical run without compromising other priorities. We will cover the specific electrical requirements in detail below.
Distance from Your Home or Cabin
The transition from a hot sauna to the cool outdoors is a wonderful part of the experience — but the walk back to your house is less pleasant in a Minnesota January or a Canadian February. For those in cold-weather climates, a shorter path back indoors means retaining that post-sauna warmth and glow longer. Consider a covered walkway, an adjacent change room, or simply a well-sited sauna that keeps the cold-air exposure brief and brisk.
Access to Water
You will regularly fill your sauna bucket to create steam (löyly) and cool your body during extended sessions. A nearby outdoor water faucet or garden hose connection makes this effortless. Beyond everyday use, many sauna enthusiasts are now building full thermal spa experiences — with cold plunge pools, outdoor showers, or nearby lakes — as part of their sauna ritual. If that appeals to you, proximity to a water source should be a primary siting consideration.
Window and Door Orientation
Think about what you want to see — and what you want to avoid seeing — when you open that sauna door. A view of a garden, lake, or tree line adds enormously to the experience. Equally, orienting the door toward your home gives you a clear, practical exit path. Many of our customers position their sauna door facing east or south to capture morning light and passive solar warmth during colder months.
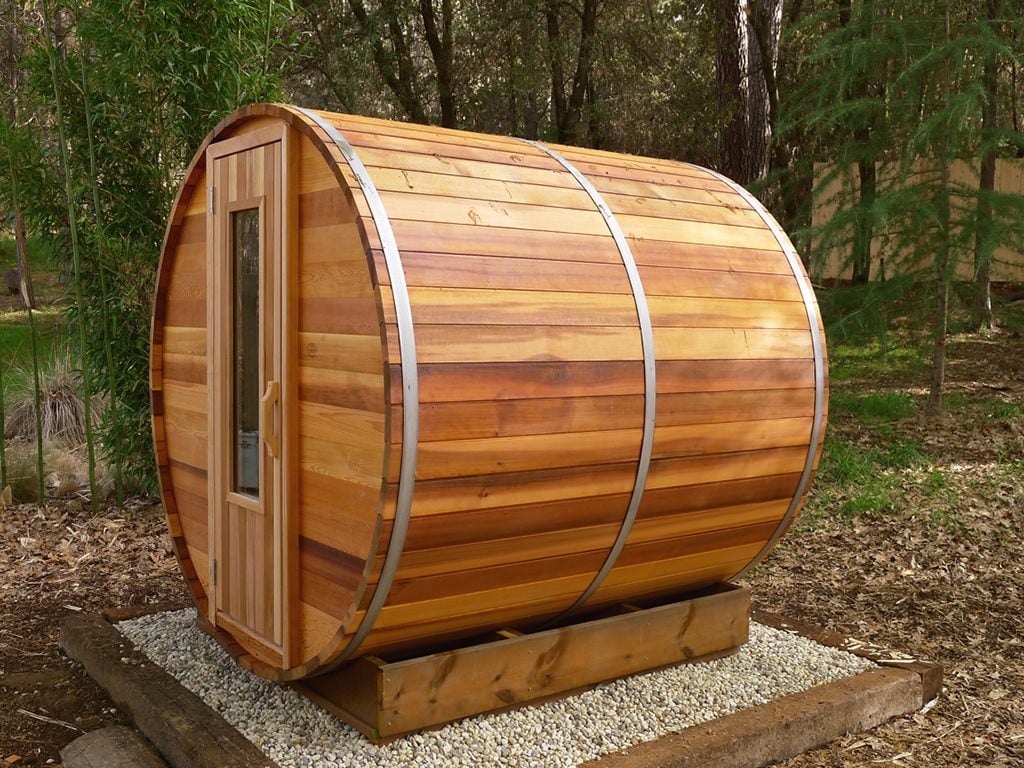
Step 2: Preparing the Foundation — The Most Critical Step
A barrel sauna is a substantial, moisture-exposed structure. Without a properly prepared foundation, you risk uneven settling, wood rot at the base, drainage problems, and structural instability over time. The good news is that a well-prepared foundation is straightforward to build with basic tools and materials. Here is the process, step by step:
- Clear and excavate the area: Remove any grass, organic material, or soft loose soil from the installation footprint. Organic material retains moisture and will eventually compress unevenly under the weight of the sauna. Dig down until you reach firm, compacted subsoil.
- Fill with compacted gravel and sand: Fill the excavated area with a layer of small aggregate gravel (3/4-inch crushed stone is ideal) topped with coarse sand. This combination provides excellent drainage — essential for a sauna that will be exposed to significant moisture, condensation, and weather year-round.
- Compact and level: Thoroughly compact the gravel and sand base using a plate compactor or hand tamper. Level the surface carefully, but incorporate a slight slope (approximately 1–2%) away from your home or any structures to encourage water drainage.
- Install concrete patio blocks or a poured pad (optional but recommended): Placing 18″ x 18″ or 24″ x 24″ concrete patio blocks over your prepared gravel base prevents tracking of sand or dirt into the sauna, provides a clean finished look, and further stabilizes the sauna base. Alternatively, a poured concrete pad offers maximum stability for a permanent installation.
Foundation Sizing Guidelines:
- For an 8-foot barrel sauna: foundation area approximately 92″ x 72″ (2.4m x 2m)
- For a 7-foot barrel sauna: foundation area approximately 80″ x 72″ (2m x 1.8m)
- Always size the foundation slightly larger than the sauna base footprint to allow for drainage clearance and easy access around the unit
The sauna base has been engineered to distribute weight broadly, so the pressure exerted on the foundation per square inch is relatively low. That said, a firm, level, well-drained base is non-negotiable for long-term structural integrity and wood preservation.
Step 3: Electrical Preparation — Know Your Requirements Before You Call an Electrician
Getting your electrical prep right before the electrician arrives saves time and avoids costly change orders. The requirements vary based on your heater type and your location. Here is what you need to know:
North American Installations (120V/240V, 60Hz):
- Standard electric heater (7.5 kW or 6.0 kW): 2-pole, 40-amp dedicated circuit
- If a sauna light is included: 3-conductor + ground, #8 AWG cable required
- Hybrid sauna heater (6 kW electric + optional infrared panels): 30 or 40-amp service depending on whether 2 or 4 IR panels are installed
International Installations (50Hz Electrical Grids):
- Standard heater: 40A, 1-pole service with 2-conductor + ground, 10mm² cable
- 6 kW heater + 2 IR panels: 32-amp service, 6mm² cable
- 6 kW heater + 4 IR panels: 40-amp service, 10mm² cable
- 5 kW heaters: 3-phase wiring available as a special-order option in international markets
Always have your electrical work completed by a licensed electrician who is familiar with outdoor and high-load sauna installations. Ensure all outdoor wiring is in weatherproof conduit rated for burial or exterior exposure. The sauna heater control and timer should be mounted in a protected location, either on an exterior wall of your home or in an adjacent covered structure.
Understanding the differences between electric, wood-burning, and propane heaters will help you decide which heating approach best suits your property and lifestyle. See our detailed breakdown of the best sauna heater options: electric, wood, or propane for a full comparison.
Wood-Fired Barrel Saunas: Site Prep Considerations
For those who want to forgo electricity entirely — or who are siting their sauna in a remote location without grid access — a wood-fired sauna heater is an outstanding alternative. The ancient tradition of wood-burning saunas delivers an unmatched authenticity, with a gradual, penetrating heat that many purists argue is simply superior to any electric alternative.
Wood-fired installations require no electrical service unless you choose to add a light. Many wood-fired sauna users opt for candles or the natural glow of the fire itself for ambiance — which is, honestly, hard to beat on a winter evening. Site preparation considerations specific to wood-fired saunas include:
- Clearance for the chimney flue: Ensure the sauna is positioned so the chimney exits cleanly above the roofline and maintains proper clearance from overhanging branches, roof overhangs, or adjacent structures. A minimum 2-foot clearance from any combustible surface is generally required.
- Wood storage proximity: Site the sauna reasonably close to where you will store firewood, but not so close that wood is stacked directly against the sauna shell (which traps moisture and invites pests).
- Fire safety: Maintain appropriate clearances from fences, buildings, and dry vegetation. Check your local fire code, as some municipalities have specific requirements for outdoor wood-burning appliances.
Ventilation: The Often-Overlooked Site Prep Element
A well-sited sauna also needs to be a well-ventilated sauna. Proper airflow within the sauna room is critical for both performance and safety — a sauna that cannot breathe properly will feel stuffy and oppressive, and it will deteriorate faster due to trapped moisture. When positioning your sauna, make sure there is adequate clearance on all sides for air circulation, and ensure that the built-in ventilation openings are never blocked by landscaping, fencing, or built-up snow.
For a deeper understanding of why this matters, read our guide on why a sauna needs to breathe — it covers intake and exhaust ventilation principles that apply to every barrel sauna installation.
Frequently Asked Questions: Barrel Sauna Site Preparation
This varies by municipality, state or province, and country. In many jurisdictions, a freestanding outdoor structure below a certain square footage does not require a building permit. However, the electrical work almost always requires a permit and licensed inspection. We strongly recommend checking with your local building department before beginning any installation. Some HOAs also have restrictions on outdoor structures.
Yes — but the deck must be engineered to support the weight load. A fully assembled cedar barrel sauna with a heater, rocks, and benches can weigh between 800 and 1,500 lbs depending on size. Consult a structural engineer or qualified contractor to verify that your deck can safely handle the load before proceeding with installation on an elevated surface.
Compacted gravel with coarse sand is the most widely recommended base material for barrel sauna installations. It provides excellent drainage, is relatively simple to install, and handles the freeze-thaw cycles common in cold climates without cracking. Concrete patio blocks or a poured slab on top of a gravel base offer additional stability and a cleaner finished appearance.
For electric and wood-fired saunas, most local codes require a minimum setback from structures — typically 5 to 10 feet from combustible surfaces, though this varies. Practically speaking, positioning the sauna 8–15 feet from your home balances easy access with appropriate clearance and aesthetics. Always verify your local setback requirements.
Once installed, the exterior of your cedar barrel sauna can be treated with a UV-protective outdoor wood sealant or stain to slow the natural weathering process. Western red cedar will silver gracefully without any treatment, but sealing extends the life of the finish. Avoid sealants on interior surfaces, as these can off-gas harmful compounds when heated. Learn more about staining and maintaining your barrel sauna for best practices.
The assembly of the sauna itself is well within the ability of a motivated DIY homeowner — most of our kits can be assembled over a weekend with basic tools and a couple of helpers. The foundation preparation and electrical work, however, benefit significantly from professional involvement. A solid foundation requires proper compaction equipment and leveling skills, and the electrical connections must be completed by a licensed electrician in virtually every jurisdiction. See our DIY outdoor barrel sauna guide for a full breakdown of what you can handle yourself and where to bring in the pros.
Final Thoughts: Invest in the Foundation, Enjoy the Rewards
A cedar barrel sauna is not an impulse purchase — it is a long-term investment in your home, your health, and your quality of life. Taking the time to choose the right location, prepare a solid foundation, and wire the installation correctly is the difference between a sauna that delivers decades of joy and one that causes ongoing maintenance headaches.
With over 25 years of experience helping homeowners and commercial clients across North America install barrel saunas successfully, Northern Lights Cedar Barrel Saunas stands behind every kit we sell. If you have questions about your specific site conditions, our team is always available to help you think through the details before you break ground.
Ready to explore your options? Browse our full range of cedar barrel sauna models and take the first step toward your own backyard wellness retreat.