An electric sauna heater is the beating heart of your wellness retreat. While a sauna can be heated using infrared panels, wood stoves, or gas, the electric sauna heater remains the most popular, convenient, and consistent method for achieving that authentic Finnish sauna experience.
An electric heater works by warming a bed of specialized sauna rocks using high-powered electrical elements. When water is ladled over these hot stones, it generates an intense burst of steam (known as Löyly), creating the latent heat, moisture, and relaxing ambiance traditional saunas are famous for.
However, installing a high-voltage appliance in a high-heat, high-moisture environment requires careful planning. From electrical codes to clearance distances and post-installation accessories, here is everything you need to consider before and during the installation of your sauna heater.
1. Electrical Requirements and Wattage
You cannot simply plug a traditional electric sauna heater into a standard wall outlet. You must ensure the heater is not only powerful enough to heat the cubic volume of your sauna but also compatible with your home’s electrical panel.
- Dedicated Circuits: Most household outlets run on 110-120 volts. However, almost all standard and large electric sauna heaters require a dedicated 220-240 volt circuit.
- Hardwiring: Sauna heaters do not use standard plugs. They must be hardwired directly to your electrical breaker box.
- Sizing the Heater: As a general rule of thumb, you need about 1 kilowatt (kW) of power for every 45 to 50 cubic feet of sauna space. If you are installing an outdoor barrel sauna in a cold climate, you may need to size up slightly to compensate for heat loss.
2. Building Codes and Professional Installation
When electricity and water mix, safety is the absolute highest priority. International and local building codes strictly regulate how sauna heaters must be installed.
Hire a Licensed Electrician: Unless you are a certified electrician, you should never attempt to wire a 220V sauna heater yourself. A licensed professional will ensure the correct wire gauge is used (often copper wire with high-heat insulation rating, like 90°C wire) and that the GFCI/breaker setup meets local code requirements. Furthermore, ensure the heater you purchase is strictly UL or CSA certified for safety.
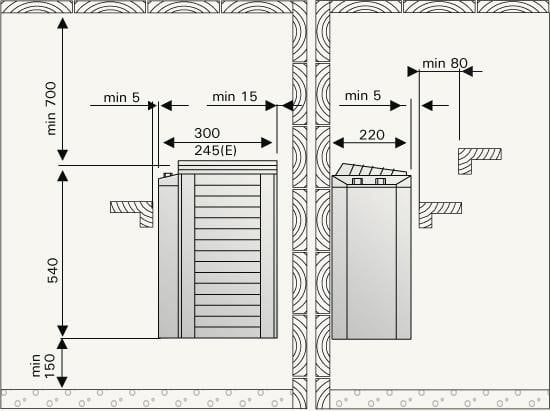
3. Clearance Distances and Mounting
Every sauna heater generates intense radiant heat. To prevent the cedar wood walls from scorching or catching fire, strict clearance distances must be maintained. Every manufacturer provides specific minimum clearance requirements printed on the heater’s label and in the manual.
- Wall Clearance: There must be a specific gap between the back and sides of the heater and the wooden walls.
- Floor Clearance: Wall-mounted heaters must sit a specific number of inches above the floor to allow cold air to enter the bottom of the heater for convective airflow.
- Ceiling Clearance: There is a mandatory minimum distance from the top of the heater to the ceiling to prevent fire hazards.
- Heater Guards: It is highly recommended to install a wooden heater guard rail around the unit to prevent bathers from accidentally touching the hot metal casing.
4. Placing the Sauna Rocks
Once the heater is mounted and wired, you cannot simply dump the sauna rocks into the basket. How you place the rocks dictates how efficiently your heater will operate.
First, wash the rocks thoroughly with water to remove any dust or debris. When placing them in the heater, place the larger stones at the bottom and the smaller ones at the top. Do not pack them tightly. You must leave loose gaps between the stones so that the heat from the electrical elements can travel upward. If the rocks are packed too tightly, the heater will overheat and the internal high-limit switch will repeatedly trip, potentially ruining the elements.
5. Post-Installation: The “Burn-Off” Phase
Before you step into your sauna for your first session, you must “cure” the heater. Manufacturing processes often leave a thin layer of protective oil on the stainless steel elements.
Turn the heater on to its maximum temperature and let it run for 45 to 60 minutes with the sauna door fully open. This will burn off the residual oils, which may produce a slight odor or light smoke. Once the smell dissipates, your heater is ready for use.
6. Equipping Your New Sauna: The Essentials
A newly installed heater is just a heat source. To actually use the sauna properly and generate steam, you need a few essential accessories to complete your setup.
Climate Monitoring
You need to know exactly how hot your newly installed heater is getting. A high-quality thermometer is a must. For a sleek, modern aesthetic, the Rento Black Aluminum Thermometer looks fantastic. If you prefer a rustic, classic look, a Vertical Cedar Thermometer and Hygrometer will allow you to track both the temperature and the moisture levels in the room.
Generating Steam (Buckets & Ladles)
To safely pour water over your hot sauna rocks, you need a proper bucket and a long-handled ladle to protect your hands from the steam. Never pour water from a plastic bottle.
- Modern Setups: The elegant Rento Aluminum Black Sauna Bucket pairs perfectly with the eco-friendly Rento Pisara Bio-Composite Ladle. Alternatively, you can purchase the complete Rento White Aluminum Bucket & Ladle Kit for a clean, minimalist vibe.
- Traditional Setups: For wood lovers, a classic Cedar Sauna Bucket with Stainless Steel Ladle is timeless. If you have a large commercial sauna or use a lot of water, the high-capacity 18L Cedar Bucket with Lid is ideal.
Aromatherapy and Comfort
To elevate your very first sauna session, mix a few drops of Rento Birch Sauna Scent into your bucket water. When ladled onto the rocks, it fills the room with the authentic, earthy aroma of a Finnish forest.
Finally, when your session is over, wrapping yourself in a premium, highly absorbent Rento Kenno Black Bathrobe makes the cool-down process incredibly comfortable and luxurious.
Conclusion
Installing an electric sauna heater is not a DIY weekend project for a novice. It requires respecting building codes, executing precise clearance measurements, and utilizing professional electrical work. But once installed safely and equipped with the right accessories, your electric heater will provide decades of reliable heat, deep sweating, and transformative health benefits.
Frequently Asked Questions
Can I install a 110V plug-in electric sauna heater?
While a few very small, 1-person indoor sauna heaters run on 110V, the vast majority of traditional electric sauna heaters require a hardwired 220-240V dedicated circuit to produce enough heat to reach 170°F+ and generate steam.
Do I need a floor drain near my sauna heater?
While not strictly required by all residential codes, a floor drain is highly recommended. When you pour water over the heater rocks, excess water can drip down to the floor. A drain prevents water from pooling, protecting your sauna’s wood and preventing mold.
Can I use any type of rocks on my electric heater?
No. You must only use certified sauna stones (like vulcanite or olivine diabase). Standard river rocks or driveway stones can contain trapped moisture and may crack or explode when exposed to the extreme heat of the electrical elements.